So you purchased a new motorcycle battery or you are looking into purchasing a new battery for your bike? Charging it correctly the first time is essential. An incorrect first charge for a motorcycle battery can make the battery less capable for the rest of its lifetime.
I came across this problem when buying a new battery for my Honda CB600f last year. I couldn’t find much information online, so that’s why I wrote this article. I hope it helps you to charge your new battery the correct way, to enjoy a fully powered battery for a long time!
By the way; this article applies to all types of batteries. There are some differences but I’ll point them out.
I’ll start with a short summary because I know that not everybody wants to read the whole article. Do you want to go into detail? In that case you can read the complete article under the image.
Summary
Filling the battery with acid
- Remove the acid pack and the battery from the box.
- Protect yourself by at least wearing protective gloves and safety glasses.
- Fill the battery till the correct level (read below for detailed instructions).
- Close the battery cells with the battery cap(s).
Charging the battery for the first time
- Realize that it’s essential to charge the battery in the proper way the first time. Doing this wrong can affect the battery for the rest of its lifetime.
- Figure out the Amps to charge by dividing the battery’s Ah by 10. So a 14Ah battery should be charged at 1.4 Amps.
- Hook your battery tender up to the battery by using the crocodile clamps. Don’t have a battery tender yet? Your best choice is the Battery Tender Junior by Deltran (check the low price on Amazon). It’s inexpensive and the most sold battery tender worldwide.
- Keep an eye on your battery while charging. Pause charging in case the battery becomes hot.
- Charge the battery until the indicator tells you it’s fully charged.
- Remove the charger as soon as the indicator tells you it’s fully charged, don’t overcharge it!
Safely charging a motorcycle battery
First things first! Before explaining anything, I want to point out that working safely is crucial. You’re working with acids and you will want to protect yourself.
First of all, read the safety information that comes with your battery. Also, make sure to wear protective gloves and glasses to protect your hands and eyes from any contact with the acids. You’ll want to clean up any spills using water and baking soda to neutralize the battery acid.
Keep in mind that battery acid is toxic and it can cause harm and injury if it goes anywhere where it isn’t supposed to go. Also, make sure you work in a well-ventilated area. The gasses produced from batteries charging or discharging are potentially flammable and explosive, so make sure you stick to the safety protocol.
Filling a conventional motorcycle battery
I’ll start by explaining how you can fill a conventional motorcycle battery. Are you filling a maintenance free battery? In that case, you should follow the instructions in the next paragraph.
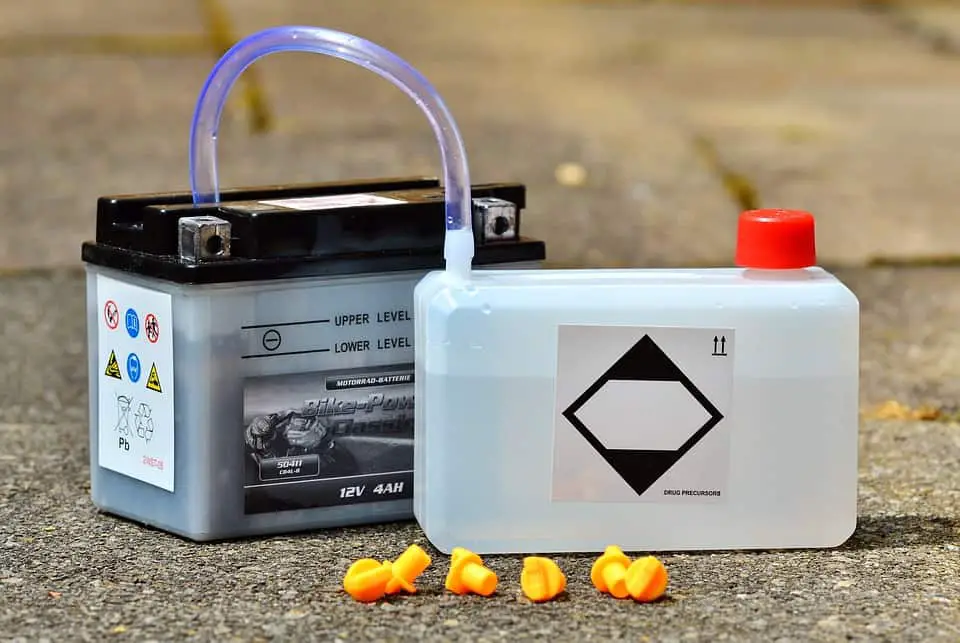
What’s in the box
If you open up the box, you’ll find the instructions, a vent hose, the battery terminal knots, the acid pack and the battery itself.
From there, we are going to remove the acid from the plastic packaging. You’ll notice that the pack came with two sizes of hoses. The shorter hose is for filling the battery, whiles the longer one is used as the vent hose.
On a conventional battery, it’s important that you remove the cap from the vent system om the battery, before filling it with acid. After you’ve done that, you can go ahead and connect the vent hose to the spout. Now the battery is ready to be filled.
You might realize that the battery acid pack has a cap on one side. This is used by the manufacturer to fill up the package. You don’t want to touch this and you can leave it as it is. We’re going to use the spout on the other side to fill up the battery.
Filling up the battery
The first thing you’re going to do is removing the filling caps from the battery. Keep in mind that some models might have threated caps that you’ll have to twist out, whiles others can be removed by simply pulling them out.
After removing the caps, you can cut off the end of the spout of the acid pack. You can slide the short hose into place, that will help you to fill up the battery. To fill up the battery, move the hose to the cell openings and slightly squeeze the acid pack to squirt the acid into the cells. Fill it up to the upper-level line and move to the next cell.
You might notice that the levels in each cell might slightly drop. This is due to the fact that air bubbles are being released. Repeat the above process and make sure all the cells are filled till, or slightly under, the upper level.
Remove any air bubbles and close the battery
In the end, you’ll want to gently tap the battery to remove any air bubbles that are left. When all the levels are correct, close the cells by putting the caps into place. Do you have to screw the caps into place? Make sure you only use your fingertips and avoid overstressing them with tools like a screwdriver.
Make sure you clean any spilled acid with some water and baking soda.
Filling a maintenance-free motorcycle battery
So now that we’ve discussed filling up a conventional motorcycle battery, I’ll explain the process for a maintenance-free battery. The process is actually quite similar.
What’s in the box
In the box, we’ll find the instructions, the battery acid, the battery hardware, a little push pin, and the battery itself.
The difference with the conventional battery is the fact that the battery acid pack is pre-measured. It’s made for this specific battery and will contain the exact right amount of acid.
Filling the maintenance-free battery
The first step is to remove the foil cap that seals the battery. After that, you can go ahead and remove the acid pack from the plastic packaging. You’ll also find a plastic cap for the cells, move that aside as we need it to close the battery in the end.
You’ll see that each cell on the acid pack is closed with its own foil sealing. The opening of the battery cells is designed to puncture this foil.
Place the acid package onto the battery by moving the sprouts into the opening of the battery cells. Push firmly so that the battery cell openings will puncture the acid pack foil.
You should start to see bubbles, which indicates that fluid is making its way into the battery. You can speed up the process by using the push pin to make a little hole into the top of the acid package (one hole for each cell). This will allow air to go into the pack, which means the acid can run into the battery cells faster.
It’s important that the electrolyte from each cell in the acid pack is emptied in the battery. You’ll want to leave the pack to zip for 30 minutes to an hour to make sure that all the acid moves into the battery.
Last but not least, you can go ahead and remove the acid pack and close the battery by placing the cap into place. Make sure you close this with your fingers, don’t use a hammer or any other tool of that sort.
Also, make sure to clean up any acid that has been spilled by using water and baking soda. However, using this method you shouldn’t spill any acid at all! It’s no problem if you spilled a drip or two, but keep in mind that the amount of acid in the pack is exactly the amount that needs to go into the battery.
Charging a new battery for the first time

A battery’s first initial charge is the most important charge of its life! If you don’t fully charge a battery for the first time, it’s possible that the battery will never reach a full 100% charge for the rest of its life. This is true for all batteries except Lithium batteries.
To charge a battery properly, there are a few key rules you’ll have to follow to do it correctly and safely.
First of all, you shouldn’t use an automotive battery charger when charging a motorcycle battery. These batteries require a lower Amperage charger to prevent overheating and damaging the battery.
To figure out what amperage your battery is supposed to be charged at, go ahead and divide it’s Ah rating by 10. For example: If you have a 14Ah battery, dived it by 10. That means you’ll have to charge it at 1.4 Amps.
Motorcycle batteries or other small batteries should never be charged anything higher than 3 Amps.
You’ll need a battery tender in order to charge your motorcycle battery. The best pick for a battery tender is the Battery Tender Junior by Deltran (check the low price on Amazon). It does the job well, is inexpensive and it the most sold battery tender you’ll find.
Connect the battery tender to the battery by using the crocodile clamps. You’ll see that the light of your battery tender goes on, indicating that the battery has to be charged.
It’s important to monitor your battery when charging. Does the battery get hot while charging? Stop charging by taking the power off the battery tender, and then removing the crocodile clamps from the battery. Let the battery cool down and start charging again when it’s completely cooled now.
Keep charging until the battery tender indicates that the battery is fully charged. I told you that undercharging your battery for the first time will damage the battery, but the same thing goes for overcharging it. Does your battery tender indicate that the battery is full? Stop charging it immediately for the best result.
End result: A new, fully powered battery
The end result of a correct charge is a fully charged battery that uses 100% of its capability. You’ll have the benefits of the correct first charge for years to come. I hope my article helped you to charge your new battery correctly. All that’s left is for me to wish you wonderful safe miles. Enjoy your ride!